


Table of contents
- What Are We Going to Build?
- Prerequisites
- Tools We'll Need
- Let's Begin!
- Writing our Smart Contract in Solidity:
- 1. Get our Local Ethereum Network Running
- 2. Creating our Smart Contract
- 3. Running Our Contract Locally
- 4. Finishing the Smart Contract Logic
- 5. Deploying the Smart Contract
- 1. Let's create a file called deploy.js inside the scripts folder. Enter the code given below in the deploy.js file we just created.
- 2. We'll be using a platform called Alchemy. Sign up [here]. (https://www.alchemy.com/).
- 3. This is the final part of the deployment. Make changes to your hardhat.config.js file by entering the code below:
- 4. Now, we're going to deploy the contract. We can do that by moving to the terminal and running the following command:
- Building the Web App in React
- Send lucky users some Ethereum
- Final Steps
- ✍🏻 Conclusion.
In this Web3 tutorial, we'll be building a fully-functional blockchain, web3 App. We'll be starting with the basics of building a blockchain app and at the end, we'll get our web3 app live for everyone to use.
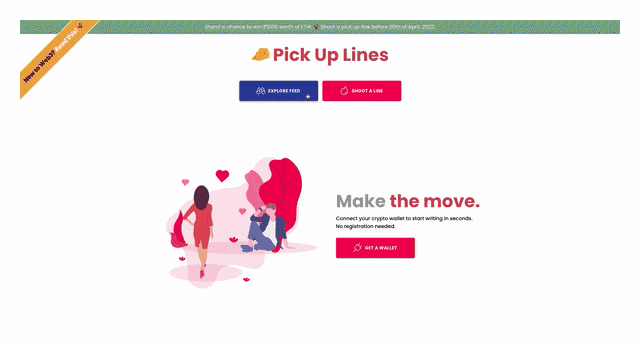
What Are We Going to Build?
We'll be building a Decentralized App(dApp) called 🧀 Pick Up Lines. As the name suggests, our users will be able to send some good ol' pickup lines and stand a chance to win Ethereum as a reward.
Prerequisites
- Beginner to intermediate knowledge of React
- Some familiarity with Solidity smart contracts
- Basic understanding of blockchain programming
Tools We'll Need
Work becomes play with the right tools, right? Fortunately, web3 has a plethora of tools at its disposal to achieve the infamous WAGMI 🧘
- Visual Studio Code or any text editor
- Hardhat for Ethereum development
- Metamask as a crypto wallet
- Vercel and Alchemy as hosting platforms
Let's Begin!
Now, that we have some idea of the final app and the tools that we're going to use, let's start writing code!
First, we'll write the smart contract of our blockchain app. Then, we'll build our React app, and at the end, connect those two things to have a full-fledged web3 app.

Writing our Smart Contract in Solidity:
1. Get our Local Ethereum Network Running
We need to spin up a local Ethereum network. A local Ethereum network is a blockchain network that specifically runs on your local machine. We'll use it for testing while we build our application, as it gives us all the blockchain features without using real cryptocurrency.
In this web3 tutorial, we'll be using Hardhat. Since we need to test our blockchain app locally before launching, we'll use fake ETH and fake test accounts to test our smart contract through Hardhat. Most importantly, it will facilitate compiling our smart contract on our local blockchain.
Now, head to the terminal and move to the directory you want. Once there, run these commands:
mkdir pickup-lines
cd pickup-lines
npm init -y
npm install --save-dev hardhat
Next, let's get a sample project running:
/*To create our Hardhat project*/
npx hardhat
Run the project:
/*To compile our contracts*/
npx hardhat compile
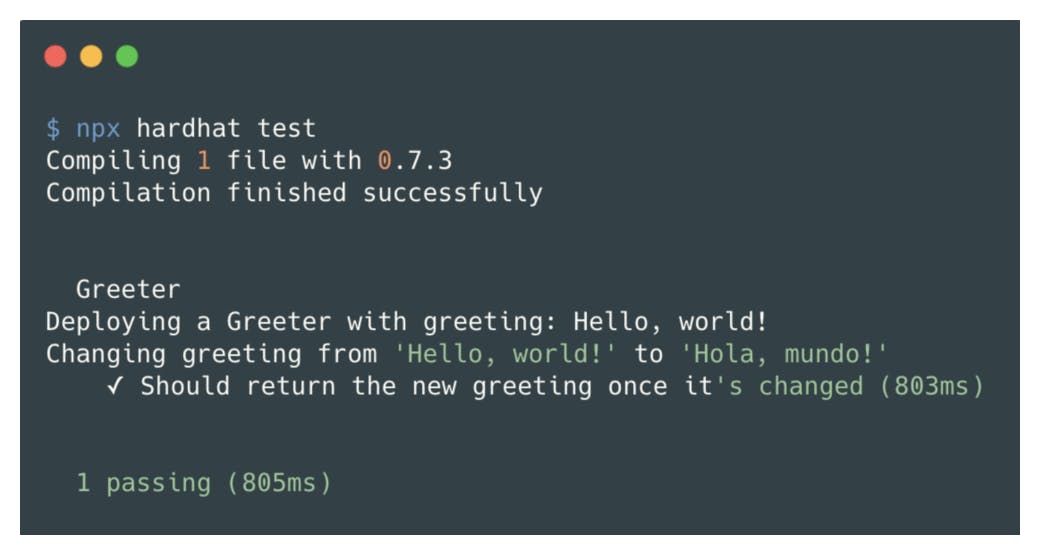
Test the project:
/*To run our tests*/
npx hardhat test
The code above sets up a barebone Hardhat project. With no plugins, it allows you to create your own tasks, compile your Solidity code, and run your tests. Basically, you’re creating a blockchain network in a local environment
You'll see something similar to this:
2. Creating our Smart Contract
Now, let's create a PickupLines.sol file under the Contracts directory.
We need to follow a strict folder structure. It's super important because we're building on top of Hardhat, and the default paths for our
/contracts,/scriptsand/testare pre-defined. Not following this structure will lead to our Hardhat tasks failing. Be careful!
/*Use a license depending on your project.*/
// SPDX-License-Identifier: UNLICENSED

/*Code is written for Solidity version 0.4.16, or a newer version*/
pragma solidity ^0.8.0;

/*Built-in Hardhat interactive JavaScript console*/
import "hardhat/console.sol";

/*Main Solidity Contract*/
contract PickupLines {
   /*Constructor function for our contract*/
    constructor() {
        console.log("I am the Cheesy PickUp Lines' smart contract.");
    }
}
3. Running Our Contract Locally
Now, let's create a script to run the smart contract we just built. This will enable us to test it on our local blockchain.
Go into the scripts folder and create a file named run.js. In the run.js file, enter the following code:
/*The `main` function to run contract locally for an instance.*/
const main = async () => {
  /*Helper function to get the contract `PickupLines`*/
  const contracts = await hre.ethers.getContractFactory("PickupLines");

  /*Deploying the contract for an 'instance'*/
  const contract = await contracts.deploy();
  await contract.deployed();

  /*Address of the deployed contract.*/
  console.log("Contract deployed to:", contract.address);
};

/*A try-catch block for our `main` function*/
const runMain = async () => {
  try {
    await main();
    process.exit(0); // exit Node process without error
  } catch (error) {
    console.log(error);
    process.exit(1); // exit Node process while indicating 'Uncaught Fatal Exception' error
  }
};

/*Running the `runMain` function.*/
runMain();
Let's run the run.jsfile we just created from our terminal:
/*To run the `run.js` file.*/
npx hardhat run scripts/run.js
Did that go well? You can see the console.log message we put in our constructor() method. There, you'll also see the contract address too

4. Finishing the Smart Contract Logic
Now, let's make our contract a bit fancier.
We want to be able to let someone send us a pickup line and then store that line in the blockchain. So, the first thing we need is a function, so anyone can send us a pickup line.
In the PickupLines.sol file under the Contracts folder, enter the following code:
contract PickUpLines {
    /*Solidity event, that fires when a new line is submitted.*/
    event NewPickUpLine(address indexed from, uint256 timestamp, string line);

    /*Data members*/
    uint256 private seed; /*Seed data*/
    uint256 totalLines; /*Total lines data*/
    mapping(address => bool) hasWrote; /*Map of all addresses with a line submitted*/

    /*A composite data member for a pick up line*/
    struct PickUpLine {
        address writer;
        string line;
        uint256 timestamp;
    }
    /*Array of all pick up lines submitted.*/
    PickUpLine[] pickuplines;

    constructor() payable {
      console.log("I am the Cheesy PickUp Lines' smart contract!");
    }

    /*Function for adding a new line to the contract.*/
    function newLine(string memory _line) public {

        /*Adding a new Pickup Line to our blockchain.*/
        totalLines += 1;
        pickuplines.push(PickUpLine(msg.sender, _line, block.timestamp));
        hasWrote[msg.sender] = true;
        emit NewPickUpLine(msg.sender, block.timestamp, _line);
    }

    /*Function to get all the lines submitted to the contract.*/
    function getTotalLines() public view returns (uint256) {
        console.log("We have %s total PickUpLines.", totalLines);
        return totalLines;
    }
}
Boom! So, that's how a function is written in Solidity.
We also added a totalLines variable that is automatically initialized to 0. This variable is special because it's called a state variable, and it's a special one because it's stored permanently in our contract storage.
5. Deploying the Smart Contract
Now, we'll upgrade from our local blockchain to a globally-accessible blockchain.
Follow the 4 steps below:
1. Let's create a file called deploy.js inside the scripts folder. Enter the code given below in the deploy.js file we just created.
   /*The `main` function to deploy contract locally*/
   const main = async () => {
   /*Getting deployer's address.*/
  const [deployer] = await hre.ethers.getSigners();

  /*Getting deployer's ETH balance*/
  const accountBalance = await deployer.getBalance();

  /*Logging the Deployer's address and the balance.*/
  console.log("Deploying contracts with account: ", deployer.address);
  console.log("Account balance: ", accountBalance.toString());

  /*Deploying the contract.*/
  const contracts = await hre.ethers.getContractFactory("PickupLines");
  const contract = await contracts.deploy();
  await contract.deployed();

  /*Logging the address of the deployed contract.*/
  console.log("PickupLines address: ", contract.address);
};

/*A try-catch block for our `main` function*/
const runMain = async () => {
  try {
    await main();
    process.exit(0);
  } catch (error) {
    console.log(error);
    process.exit(1);
  }
};

/*Running the `runMain` function.*/
runMain();
2. We'll be using a platform called Alchemy. Sign up [here]. (alchemy.com).
We'll be using Alchemy to deploy our contract on the testnet. This is because if we use the Ethereum Mainnet, then every action/transaction on our app will have a real monetary value. We don't want to do that until our app is fully developed for public usage. For now, we're just testing our app.
With a testnet, we'll be able to enjoy all the functions of a blockchain, albeit with fake cryptocurrency. You can get some fake ETH here.
Learn more about Alchemy right here. 👇
3. This is the final part of the deployment. Make changes to your hardhat.config.js file by entering the code below:
 //Find YOUR_ALCHEMY_API_URL in the alchemy dashboard.
require("@nomiclabs/hardhat-waffle");

module.exports = {
  solidity: "0.8.0",
  networks: {
    rinkeby: {
      url: "YOUR_ALCHEMY_API_URL",
      accounts: ["YOUR_WALLET_ACCOUNT_KEY"]
    },
  },
};
Note: Accessing your private key can be done by opening MetaMask, changing the network to "Rinkeby Test Network", and then clicking the three dots and selecting "Account Details" > "Export Private Key".
4. Now, we're going to deploy the contract. We can do that by moving to the terminal and running the following command:
npx hardhat run scripts/deploy.js --network rinkeby
Did it work? EPIC.
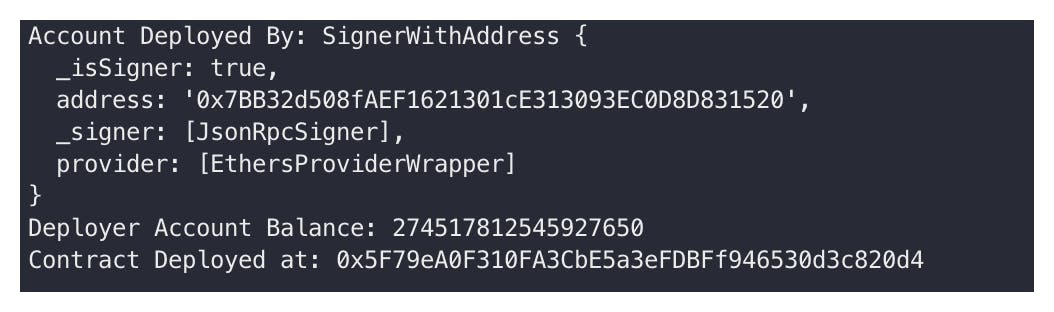
We deployed the contract, and we also have its address on the blockchain. Note the address somewhere, as our website is going to need this so that it knows where to look on the blockchain for your contract.
Building the Web App in React
1. Setup a Basic React App with Metamask
It's time to start working on our web app. Our contract was pretty simple. Now, let's figure out how the front-end app can interact with our smart contract.
Note: We've built a starter kit for you! Here's the link to the repository. You can clone the repository and start working.
The purpose of this blog post is to get you accustomed to blockchain development. We won't be going too deep into the front-end development in this section.
2. Connect the Wallet to our App
Next, we need an Ethereum wallet. There's many available, but for this project, we're going to use Metamask. Download its browser extension and set up your wallet here.
In the App.tsx file inside the src folder, enter the following code:
import React, { useEffect, useState }  from "react";
import { ethers } from "ethers";
import './App.css';

/*This will be present on the terminal once you deploy the contract.*/
const contractAddress = '0x52BB......';
/*Copy-Paste the ABI file from the contract folder into this repository.*/
import abi from "./utils/PickupLines.json";

export default function App() {
  /*State variable to store the account connected with the wallet.*/
  const [currentAccount, setCurrentAccount] = useState("");

  /*Function to check if the wallet is connected to the app.*/
  const checkIfWalletIsConnected = async () => {
    try {
      const { ethereum } = window;

      if (!ethereum) {
        console.log("Make sure you have metamask!");
        return;
      } else {
        console.log("We have the ethereum object", ethereum);
      }

      const accounts = await ethereum.request({ method: "eth_accounts" });

      if (accounts.length !== 0) {
        const account = accounts[0];
        console.log("Found an authorized account:", account);
        setCurrentAccount(account);
      } else {
        console.log("No authorized account found")
      }
    } catch (error) {
      console.log(error);
    }
  }

  /*Function to connect the wallet*/
  const connectWallet = async () => {
    try {
      const { ethereum } = window;
      if (!ethereum) {
        alert("Get MetaMask!");
        return;
      }
      const accounts = await ethereum.request({ method: "eth_requestAccounts" });
      console.log("Connected", accounts[0]);
      setCurrentAccount(accounts[0]);
    } catch (error) {
      console.log(error)
    }
  }

 /*React hook to check for wallet connection when the app is mounted.*/
  useEffect(() => {
    checkIfWalletIsConnected();
  }, []);

  return (
    <div className="mainContainer">
      <div className="dataContainer">
        <div className="header">
        🧀 Hey there!
        </div>
        <div className="bio">
        <span>Welcome to Pick-Up Lines!</span>
        <button className="button" onClick={null}>
          Shoot Line
        </button>

        {/*If there is no current account render this button*/}
        {!currentAccount && (
          <button className="button" onClick={connectWallet}>
            Connect Wallet
          </button>
        )
      </div>
    </div>
    </div>
  );
}
3. Call the Smart Contract From our App
We now have a front-end app. We've deployed our contract. We've connected our wallets. Now let's call our contract from the front-end side using the credentials we have access to from Metamask.
Add the following pickup function in our App component inside the App.tsx file:
const pickup = async () => {
    try {
      const { ethereum } = window;

      if (ethereum) {
        const provider = new ethers.providers.Web3Provider(ethereum);
        const signer = provider.getSigner();
        const contract = new ethers.Contract(contractAddress, contractABI, signer);

        /*Get the count of all lines before adding a new line*/
        let count = await contract.getTotalLines();
        console.log("Retrieved total lines...", count.toNumber());

        /*Execute the actual pickup lines from your smart contract*/
        const contractTxn = await contract.wave();
        console.log("Mining...", contractTxn.hash);

        await contractTxn.wait();
        console.log("Mined -- ", contractTxn.hash);

        /*Get the count of all lines after adding a new line*/
        count = await contract.getTotalLines();
        console.log("Retrieved total lines count...", count.toNumber());
      } else {
        console.log("Ethereum object doesn't exist!");
      }
    } catch (error) {
      console.log(error);
    }
}
Now to call the function, let's create a button in the App.tsx file. Add the following code:
<button className="button" onClick={pickup}>
    Send a line
</button>
When you run this, you'll see that the total line count is increased by 1. You'll also see that Metamask pops us and asks us to pay "gas" which we pay by using our fake crypto.
Send lucky users some Ethereum
1. Set a Prize and Select Users to Send Them Ethereum
So right now, our code is set to store random pick up lines every single time. Let's make it more interesting by adding a reward algorithm inside our newLine function. Modify the newLine function in the PickupLines.sol file:
function newLine(string memory _line) public {
  if (hasWrote[msg.sender]) {
    revert(
      "It seems you've posted a line already. We don't do repeats when it comes to picking up lines!"
     );
   }
  /*Adding a new Pickup Line to our blockchain.*/
  totalLines += 1;
  pickuplines.push(PickUpLine(msg.sender, _line, block.timestamp));
  hasWrote[msg.sender] = true;
  emit NewPickUpLine(msg.sender, block.timestamp, _line);

 /*Reward 10% of the senders by creating a random seed number.*/
 seed = (block.difficulty + block.timestamp + seed) % 100;
 if (seed <= 10) {
  uint256 prizeAmount = 0.0001 ether;
  require(
    prizeAmount <= address(this).balance,
    "The contract has insufficient ETH balance."
  );
  (bool success, ) = (msg.sender).call{value: prizeAmount}("");
  require(success, "Failed to withdraw ETH from the contract");
  }
}
Here, the algorithm needs a random number. We take two numbers given to us by Solidity, block.difficulty and block.timestamp, and combine them to create a random number.
To make this random number even more random, we'll create a variable seed that will essentially change every time a user sends a new line. We combined all three of these variables to generate a new random seed, %100.
Now, we need the value to lie in the range of 0-99 and in order to achieve that, we’ll use the Modulo operator(%) by applying seed % 100.
Final Steps
1. Preventing spammers
Now, you have a way to randomly select people to reward. It's useful to add a condition to your site so that people can't just spam pickup lines at you.
Why? Well, maybe you just don't want them to keep on trying to win the reward over and over by sending multiple lines at you. Or, maybe you don't want just their messages filling up your wall of messages. Modify the newLine function inside the PickupLines.sol file:
contract PickUpLines {
    mapping(address => bool) hasWrote;

    struct PickUpLine {
        address writer;
        string line;
        uint256 timestamp;
    }
    PickUpLine[] pickuplines;

   /*Adding a new Pickup Line to our blockchain.*/
    function newLine(string memory _line) public {

       /*Condition to check for repetitive submission.*/
        if (hasWrote[msg.sender]) {
            revert(
                "It seems you've posted a line already. We don't do repeats when it comes to picking up lines!"
            );
        }

        hasWrote[msg.sender] = true;
    }
}
2. Finalize
Congratulations! You've got all the core functionality down.
Now, it's time for you to make this your own. Change up the CSS, the text, add some media embeds, add some more functionality, whatever. Make stuff look cool :).
✍🏻 Conclusion.

There's always multiple improvements/features one can think of with this blockchain app. Feel free to experiment with the code to improve your skills.
This blog is a part of the Hashnode Web3 blog, where a team of curated writers are bringing out new resources to help you discover the universe of web3. Check us out for more on NFTs, blockchains, and the decentralized future.